Ok then, after completing the first configurations made on the Part I of this guide we can perform a clean but attended network installation of Windows Vista.
There are two main steps to take and complete a full image and unattended deployment:
1. Creating the base image to deploy: OS, programs and other special configurations + uploading it to the WDS server.
2. Making an unattended file to be used with that image.
Creating the Base Image
Note: On this series of posts we are only considering to deploy Windows Vista or Windows Server 2008 images. The files used on WDS Native mode as unattended files are only valid to those operating systems, if you want to make unattended deployment with Windows XP or 2003 OS; you will need to use RIS or WDS Legacy Mode.
The first step it’s pretty simple, it consists on installing the operating system with all the features, programs and configurations that you want. But there are some considerations first:
After you complete the image, there’s a process where you release all the specific data involving the computer where it’s installed, like the Security Identifier (SID), computer name, etc. Here are some of the things that the image won’t keep after the release process:
· Computer name· Owner and Company name· SID
· Domain or workgroup membership· TCP/IP Settings· Regional and keyboard settings· Specific hardware drivers. This refers to specific computer hardware, like video or audio drivers. But if you only applied drivers used on the Windows installation, the same will apply for the deployment, but any other external driver installed will be unavailable.
· Any saved network connections (wireless networks saved)
· OS product key. This is an important note, since no matter if your product has been activated; the key is reset after this process.
But here are some of the things that are kept after this release process:
· Programs and features installed (pretty obvious to say that at this moment right?)
· Local Users and Groups created.· Product Keys used for programs installed. Meaning if you have Microsoft Office installed, the key used will remain as the same on the deployments.
· Windows updates installed· User Profiles: Since all the profiles configuration are basically data stored on the Users folders, all that information will be uploaded within the image.
· Printers installed.
All the uploading process is made from the client side; but we must first prepare the WDS server to be ready to receive images.
First, we are going to add a boot image that will be specially to capture operating system images.
1. Go to WDS Console and let’s upload a second boot image; it can be the same that we added on the first post using the boot.wim from a Vista or Windows Server 2008 media. 
2. Instead of naming it Windows PE, use a name like “Image Capture”.
3. After the process completes, right click on the image you just added and select “Create Capture Boot Image” 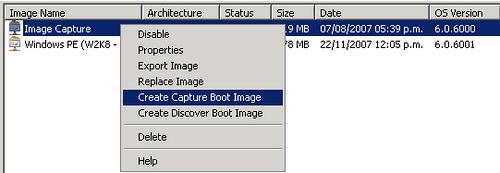
Now we have set our WDS server, let’s prepare the client using the sysprep tool and upload the image:
1. On the Vista or Windows 2008 client open a “cmd” as administrator and insert “cd c:windowssystem32sysprep”.
2. Run “sysprep /oobe /generalize /reboot”. 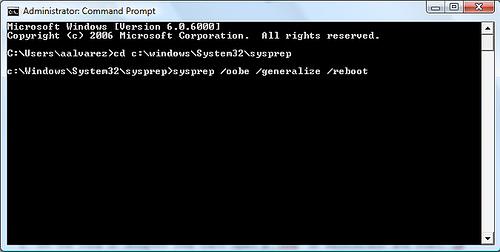
This process will require for a few second and after it completes the OS will automatically reboot. 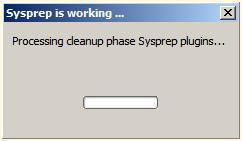
3. Soon as the machine is rebooting, press F12 to select different devices to boot.
4. Select to boot from the network card connected to the LAN
Now the client is communicating with the DHCP server to require an IP and a boot image, the DHCP will forward the request to the WDS. You will be prompted to press F12 one more time. 
5. Since we have two boot images, let’s select “Image Capture” 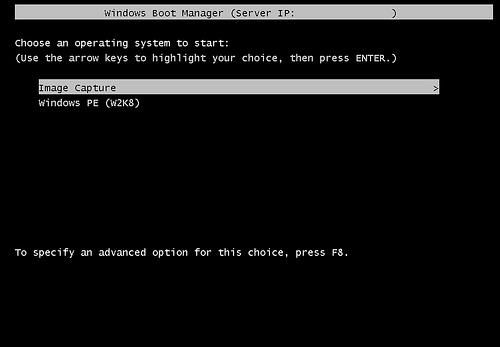
The boot image will start to load. 
6. A image capture wizard will start, click on “Next” 
7. Now let’s select the volume we want to capture, in our case C:. And put a name for the image that will be uploaded as long with a description. 
It’s important to note that if the sysprep process did not completed properly no volume will be available to select.
8. On the next window you must select where the .wim file will be temporary stored locally. Select to keep it on the root C: (this file it’s not uploaded within the image). 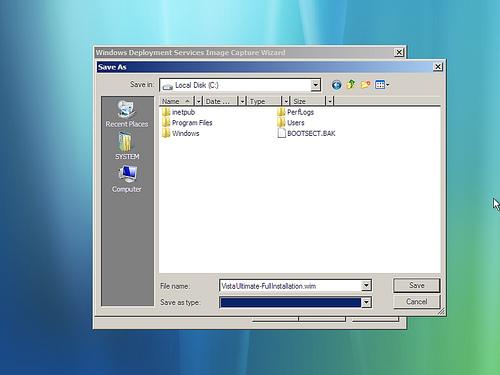
9. Select the option “Load the image to a WDS server”; put the name of the server and click on “Connect” 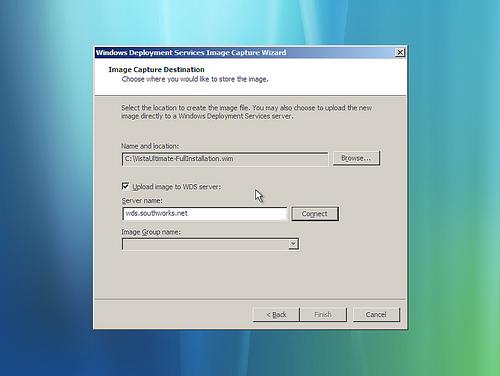
10. You will be prompted with credentials, use a privileged account on the domain or local administrator account of the WDS server.
11. Now select the image group name where you want to store the new image and click on Finish.
Here the process of the image compression and preparation starts, this could take several minutes (~30 mins to ~1hr) depending on the image size and the hardware involved. After this process, the image is uploaded to the WDS server.
After it completes, check on the WDS console, the image should be uploaded and ready to be deployed.
Still we have not configured any unattended file, so the image can be deployed but the entire OS configuration should be entered manually, like on normal OS installation but all the programs will be installed.
For the unattended files preparation and configuration take a look to the third post of WDS.


0 comments:
Post a Comment